Friday, 4 May 2012

It's Model Time

This post is going to be commenting on the three models that I created and what they are doing within the animation that I have created.

Firstly I will comment on the Giant Crossbow Model. For this model I followed the storyboard that I had created and wanted to show off the destructive power of the crossbow. This was achieved by having the crossbow take a shot and destroy the catapult model, there was not a lot of animation that needed to be done to the crossbow however the animation that needed to be done was still very fiddly. However I am still pleased with how the crossbow animation has turned out.

The animation that I used on the crossbow was to make the arrow fire from the crossbow. I could have just made the arrow fire, but I thought that was too easy and very boring, so I decided to animate the turning wheel and the rope that are attached to the crossbow (this was the fiddly part). I kept moving the turning wheel in a rotation motion so that it looked realistic, also I timed it so that the rope moved forward, with finally the arrow shooting off from the crossbow once the roped had moved forward enough. I will screenshot what I have animated on the crossbow so that it makes more sense.


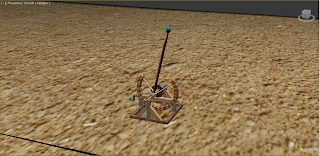
This screenshot shows the crossbow, you can see the turning wheel and the rope which I have animated to move


Next is the catapult, this model was the most tricky to animate as it has a few moving parts and if I had just left them without any movement, the animation would have been very boring and not very entertaining. Even though the catapult was the most difficult to animate I am still very pleased with how it turned out.


The animation that was needed for the catapult was, the catapult needed to fire at the crossbow and cause some damage. So I needed to animate the handle, the turning wheel, the arm and the ball all in one single movement. With the ball then causing damage on the tower.


The handle, arm, turning wheel and ball all needed to be rotated at the same time on the timeline so that it seemed realistic, and I think it does. Again I will screenshot the catapult so that it is clearer to understand.


This screenshot is of the catapult which you can see the arm has moved from top to bottom, the turning wheel, the handle have been animated to move also

The last model to comment on is the tower, this model was not really animated in anyway. I only had to 'Pro Boolean' out the catapult's ball so that it looked like the ball caused some damage to the tower.


This however did start to become an annoying problem as I found out that when something is 'Pro Booleaned' in an animation, the geometry starts to go wrong further down the animation, which became very annoying. Once I 'Pro Booleaned' out the ball I found it disappeared from the rest of the animation so I needed to clone the ball and time it within the animation with the 'Pro Boolean' which took a very long time.


Furthermore when I started to move the cloned ball into a better position it ended going in the wrong position when the animation was played, however I eventually fixed it and am happy with how it has turned out. Again I will screenshot the tower for better understanding.


This screenshot is of the tower as you can see there is a hole in the tower which is the 'Pro Boolean'

All Coming Together

For this post I am going to comment on the rendering that I have had to do within the animation.

Firstly I had finished my first attempt at an animation and was ready to render, I selected all the options that were needed apart from the compression, as the video needed to be uncompressed which I didn't do and found out once I had rendered the animation.

So I had to re-render and remebered to slect uncompressed this time. Luckily my animation didn't take long to render, unlike my colleges where there's took five hours to render!!!

Eventually the second render attempt finished but once I played it through the geometry went all wrong, and I assumed this was because of the 'Pro Boolean' so I went for a third attempt but did the render in chunks which eventually worked after the third attempt.

Next I had to import the files that I had render into Adobe Premier so that I could join them together which wasn't too difficult seeing as I hadn't used it before.

Furthermore whilst in Premier I added a static title at the end and the beginning of the animation just to tell the audience who's animation it was.

But I think I have eventually got there and am almost ready to hand in getting a little nervous now!

Wednesday, 2 May 2012

Taking In The Scenery

This post is regarding the scenario that the animation I am creating is going to be in. I was given a brief to work from, which was firstly to create three models based around 15th Century Italy and Leonardo Da Vinci and to create an animation to fit this brief too.

The three models where of Leonardo Da Vinci's inventions the only problem was to think of a scenario that matched the brief, and I decided to go with an animation that showed of the power of these inventions, which gave me the idea of a scenario being away from any city's of Italy, instead being part of a 15th century battlefield.

However I must admit that the scenario is not greatly detailed and I feel that this lets the animation down, furthermore this might have been due to me paying more attention to the animation of the models and not the surrounding area of the models.

I decided to create a cylinder for the environment floor, this was because when you look at the horizon the world is round, and if I had just used a pre-fixed plane within 3D's Max then the horizon would have been flat not round hence the use of a cylinder, then I just added a sandy texture with a bit of bump added. The reference for this texture is:

Sand Terrain Texture - n.d. Sand Texture, [electronic image] Available at: <http://www.google.co.uk/imgres?q=sand+texture&hl=en&sa=X&gbv=2&biw=1184&bih=666&tbs=isz:l&tbm=isch&tbnid=018t48LRViNrTM:&imgrefurl=http://www.imageafter.com/image.php%3Fimage%3Db1dirt005.jpg%26size%3Dfull%26download%3Dno&docid=ZWFZYoad6VJSzM&imgurl=http://www.imageafter.com/dbase/textures/grounds/b1dirt005.jpg&w=1600&h=1200&ei=3UeRT-SCLeKV0QXsr9nVAQ&zoom=1&iact=hc&vpx=882&vpy=252&dur=2571&hovh=194&hovw=259&tx=63&ty=101&sig=117830732039765713861&page=1&tbnh=118&tbnw=155&start=0&ndsp=18&ved=1t:429,r:11,s:0,i:131> [Accessed 12 April 2012].

The other texture that I have added for the scenario is the sky. I decided to add this because if I had just left it blank the animation would have been boring and not realistic however by adding in the sky texture I believe it has made the animation more realistic. The reference for this texture is:


Blue Sky Texture - 14 August 2008, BLUE SKY, [electronic image] Available at: <http://thedangerousofficial.blogspot.co.uk/2008/08/blue-sky.html> [Accessed 20 April 2012].

Tuesday, 24 April 2012

Animation So Far

The animation has started and is coming together quite nicely,


So far I have imported all the models and I was told from other peers that there might be a problem with the textures but everything was fine for me. 


I created the terrain for the animation where the crossbow and catapult will do battle, this was done by creating a simple cylinder and increasing the scale of the model so that it stretched out to cover a wide area. I choose to do the terrain this way because the world is round and hence what thee cylinder will do, I could have used a plane but the world is not flat and that it was you would have seen on the horizon.


The terrain texture reference is as follows,


Sand Terrain Texture - n.d. Sand Texture, [electronic image] Available at: http://www.google.co.uk/imgres?q=sand+texture&hl=en&sa=X&gbv=2&biw=1184&bih=666&tbs=isz:l&tbm=isch&tbnid=018t48LRViNrTM:&imgrefurl=http://www.imageafter.com/image.php%3Fimage%3Db1dirt005.jpg%26size%3Dfull%26download%3Dno&docid=ZWFZYoad6VJSzM&imgurl=http://www.imageafter.com/dbase/textures/grounds/b1dirt005.jpg&w=1600&h=1200&ei=3UeRT-SCLeKV0QXsr9nVAQ&zoom=1&iact=hc&vpx=882&vpy=252&dur=2571&hovh=194&hovw=259&tx=63&ty=101&sig=117830732039765713861&page=1&tbnh=118&tbnw=155&start=0&ndsp=18&ved=1t:429,r:11,s:0,i:131 [Accessed 12 April 2012].


I have placed all the models in place for the animation so that I can just add the cameras and not need to move any of the models from their original position.


I also had to enlarge the models because the terrain was so large the models needed to compensate also otherwise they would have been tiny specs and would not have looked very good.


I just now need to add some more camera's and the text that is going to flying across the animation


Now lets keep going.

The Walking Model

For this tutorial I looked at a real-world preset action which is making a model walk!!!


For this I needed the simple character model that I had previously created and a preset model with 3D's Max called a Biped.


Firstly I needed to have the character open and I needed to bind the Biped model to the character model. This meant I had to line up the Biped model to the character model I created, for example I needed to add extra neck links and spine links. This was to make the character model move and seem more lifelike. I could have just used the preset Biped model but that is boring.


To begin the first step was very tricky, however it started to slowly come together but I had to basically 'snap' parts of the character model onto the Biped model, this was for the character model to have an exo-skeleton so that it could complete the next process.


Once That process was complete I was able to add footsteps and make my model really come to life by making it walk! This was done by using the 'Create Multiple Footsteps' action and all I needed to do from there was to choose how many footsteps I wanted and they were placed for me. I could have added extra actions such as how far part each step was but this was just practice.


From there on it was a case of pressing play and watching the character that I had created come to life and walk


Have I created a MONSTER???


This is the screenshot of the character I have created. As you can see I have added footsteps however some parts of the character are not quite 'snapped' correctly on the Biped and was a problem I could not fix and finish

Storyboard

The storyboard is to show off the models that I have created and detail what is going to happen in the animation that I am going to be creating.


The idea that I have decided to work on is Leonardo Da Vinci's weapons and the power that those weapons would have had in the 15th Century, with hopefully a little twist.


Furthermore I have decided to use paper that is similar to tracing paper to show the model's, camera's and lights on different bits of the paper, but when they are joined on top of one another, they should show a detailed storyboard of where everything will be placed in the animation.


Right onto the details of the animation.


The first scene will be the camera panning out to reveal the crossbow that is ready to fire at its target.
Then there will be the words CHAMPION go across the screen (hopefully bringing a bit of humor to the animation).
Next will be the camera panning out to revel the catapult that is ready to fire also, with the words CONTENDER coming across the animation.
After will be a bird's eye view of the battlefield (maybe with the words FIGHT across the screen)
Next the catapult will take the first shot and will destroy part of the tower, making the camera follow the shot and shaking on impact hitting the tower.
After the crossbow will retaliate and fire back however the arrow will miss the catapult.
Next the catapult will fire a second shot with this shot also hitting the tower causing more damage.
Finally the crossbow fires back again and this shot becomes a direct hit causing the catapult badly damaged and beaten. 


Lets get Animating!!!!


This is the full storyboard, hopefully you can see the models on top then the camera behind then the light behind that


This is the models on their own


This is the camera's


This is the lights


Friday, 16 March 2012

Animation Idea

Right here we are half way through now and time to start animating the three models I have created.

I have decided to create an animation that will show each of the models that I have made, so I hope to have some close ups of the models and some effective scene's. I am going to design a storyboard which will be shown in the next blog post, with more specific details of how the animation is going to plan out, and where I am going to have lights and cameras. Furthermore the storyboard will also go into more detail about where the models are going to be in the animation etc.

To add to this I am going to have different lighting effects to show off the models at their best, otherwise if I don't add in lights the animation is going to look very dull and basic. Some of the lights that I am looking at of including are, Omni, Target Spot, Target Direct, Skylight (all standard lights). I hope that using these lights is going to make my animation more interesting to watch.

Furthermore there are different cameras that I can use, however there is only really two to select from which are, Target Camera and Free Camera. I believe they are self explanatary, so for the Target camera you select an area that you wish to target, and the free camera is where you are free to move the camera around.

Right first of all, the first scene is going to be of the tower, with a zooming out camera action onto the crossbow, which I hope to have a close up of going around Leonardo Da Vinci's crossbow invention.

Next I plan to move from the crossbow to Leonardo's invention of the catapult, using the same effect on the crossbow going around the catapult zooming in and out and looking at how the model was created.

From there I will then go into the main story of the animation which is going to be a battle between the catapult and the crossbow. I plan to have the catapult destorying parts of the tower model and the crossbow firing back and maybe some camera zoom ins of the crossbow's arrow and the catapults ball, being fired and hitting their target.

Throught out the animation I am going to have close ups of the battle, furthermore I hope to have some background music in the animation to go with the scenes in my animation.

So that is the basic layout of the animation that I am going to create, I understand it might so a little dull at the moment, but Once I have uploaded the storyboard the animation will become more clear and understanding.